
Workshop log · Software Projects
AI Rover: Off the Leash

Freedom
For the last week, my robot has been living its best life as a very expensive paperweight on a bench, plugged into a 12.6V power adapter like it’s on a hospital drip. Every test drive has come with a cord trailing behind it, which is a real mood-killer when the whole point of a “presence robot” is that it can, you know, be present somewhere other than exactly where the outlet is.
Today that changed. Batteries went in, three 18650 cells in the rover’s own 3S UPS, and I got to do the thing every robot builder waits for: unplug it, hold my breath, and wait for the batteries to charge.
Three years later (OK… Overnight). It tasted freedom.
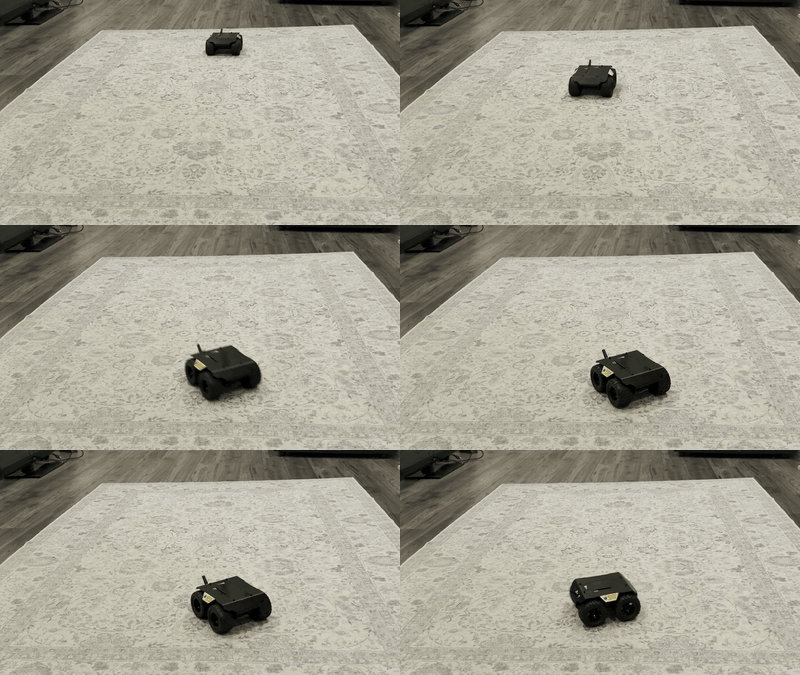
Batteries: The Least Photogenic Milestone That Matters Most
There isn’t a lot of drama to report here, which is exactly what you want from a battery install. Three 18650s into the rover’s own UPS board, first-connect polarity check (if the LED lights up wrong, you pull the cells immediately and don’t charge) and that’s it. A lesson I didn’t have to learn the hard way, for once. The rover has its own power now.
The cells themselves came from Flashlight World : genuine Samsung INR18650-30Qs, ordered and in hand faster than I expected, with a quick follow-up to make sure everything was ok. And yes, they’re Canadian. I’m contractually obligated to mention that at least once per blog post.
The bigger deal is what this unlocks, not the install itself. Every previous test, including the very first “does this thing move” moment, happened with a cord to the bench supply. That’s fine for proving the motor loop works, useless for proving the robot works. A presence robot that can’t leave the vicinity of an outlet isn’t a robot, it’s a fan with opinions.
Building a Joystick, Because Curl Loops Are No Way to Live
Up to now, “driving” the rover meant a bash script that curls a JSON blob at it ten times in a loop:
curl -sG "http://10.0.0.141/js" --data-urlencode 'json={"T":1,"L":0.5,"R":0.5}'
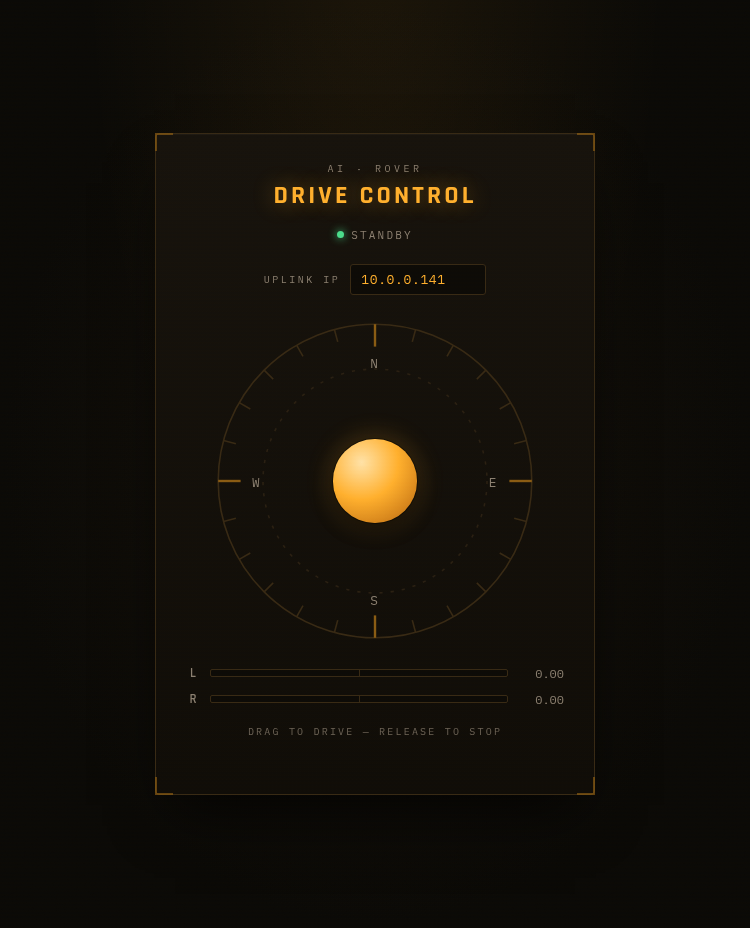
Great for proving the protocol works. Bad for actually feeling what the robot is doing. So today I built a proper on-screen joystick: a browser page. No install, no dependencies. Just HTML, CSS, and enough JavaScript to translate a mouse drag into motor commands.
The mechanic is the classic one: how far you drag the knob sets speed, which direction you drag it sets heading, and letting go snaps it back to center and cuts the motors. Under the hood that’s an “arcade drive” mix: the throw becomes a forward component and a turn component, which then combine into independent left/right wheel speeds. Standard stuff for anyone who’s driven a tank-steer robot before.
What wasn’t standard was how bad my first attempt felt in the hand. Two bugs, both worth remembering for next time:
Bug one: clicking the knob teleported it. I’d click anywhere inside the joystick pad and the knob would jump straight to my cursor and immediately start driving. Which is exactly the opposite of what a joystick should do on click. The fix was embarrassingly simple in hindsight: don’t move the knob on click at all. Just remember where you clicked, and only start responding once the mouse actually moves from there. Grab the knob off-center and it should feel like you grabbed it where you grabbed it, not like it teleported to snap under your cursor.
Bug two: the throw had a hair trigger. Below about 30% power, the gearbox doesn’t move at all. The motor just whines instead of turning the wheels. Above 30%, it drives normally. My first pass handled this by clamping any throw past a tiny deadzone straight up to that 30% floor. Which meant the instant you nudged the stick, the rover would lurch to a third of full speed with zero warning and zero fine control in between. Not smooth. A jump. The fix was to ramp into that floor instead of snapping to it: nothing in the deadzone, then a gradual climb from 0% up through 30% as you keep pushing, then continuing up to full speed. Same physical constraint, completely different feel. The difference between a light switch and a dimmer.
Small thing. Makes the whole control surface feel like a real product instead of a tech demo.
What It Looks Like Now
I ended up giving it a proper look too. I was already elbow-deep in the code, so I leaned into a mission-control aesthetic: amber phosphor console, a compass-style dial with a live heading needle, bidirectional speed meters instead of raw numbers. Entirely unnecessary for a proof-of-concept and I regret nothing.
What This Proves (And What It Doesn’t)
Worth being honest about scope here, because it’s tempting to declare victory early on a robotics project. What today actually proves: the battery and power path is solid, the rover drives untethered, and a human can control it in real time over wifi with decent feel.
What it does not prove: that the robot is “smart” in any sense. There’s no Pi in this loop yet, no camera, no brain. This is a human steering hardware directly, the robotics equivalent of pushing a car to make sure the wheels turn before you put the engine in. The actual brain is still ahead: Raspberry Pi 5, AI camera, the conversational layer. But you don’t get to the fun part on a chassis you’re not sure drives straight, so this was the right thing to nail down first.
I also built the joystick as its own self-contained module rather than a one-off page, on purpose. The plan is a proper dashboard eventually (camera feed, telemetry, drive controls, all in one place), and this way the joystick just plugs into that instead of needing a rewrite.
Next
Getting the Pi 5 and AI camera into the loop is the real next milestone: that’s when this stops being a very good remote-control car and starts being the thing I actually set out to build. Until then: battery installed, wheels turning, no cord in sight. Good day’s work.
First time here? Start with Meet Servo: Bringing Up a Salvage-Built Presence Robot for the first power-on and the control loop this post builds on.